# Phone Map Members
# Overview
The **Phone Map Members** screen is similar to the **Hunt Group Members** screen in which all it is is a screen dedicated to adding the actual **Phone Map Members** to.
- [Group Selection](#bkmrk-group-selection)
- [Adding New Phone Maps](#bkmrk-adding-new-phone-map)
- [Removing a Phone Map Group Member](#bkmrk-removing-a-phone-map)
# Group Selection
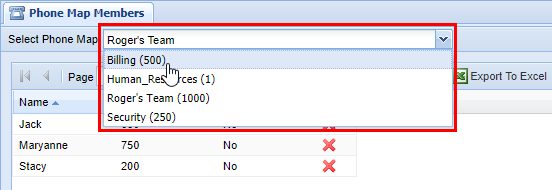
When you are modifying **Phone Map Members** you do so by selecting an appropriate **Phone Map Group**. Before editing a **Phone Map Group** and it's **Phone Map Members ensure you have a proper group selected by selecting one from the drop down menu labeled **Select Phone Map Group**, which is at the top left hand corner of the **Phone Map Members** screen. The **Phone Map Group** in the drop-down is referenced by it's **Phone Map Group Name** as well as **ID**, which was setup in the **Phone Map Group** screen.
[](https://public.intellasoft.net/uploads/images/gallery/2024-07/8uLimage.png)
# Adding New Phone Maps
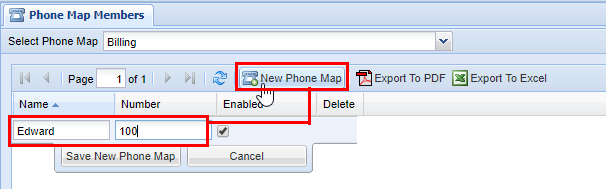
Start by navigating to the **Phone Map Members** screen via the **Navigation Panel.** Select a **Phone Map Group** from the drop down menu following the instructions according **[Group Selection](#bkmrk-group-selection).** Next click the **New Phone Map** button, choose a name and an appropriate number **(external, internal, local,** depending on th**e Phone Map Group's Class of Service).**
[](https://public.intellasoft.net/uploads/images/gallery/2024-07/EBeimage.png)
****
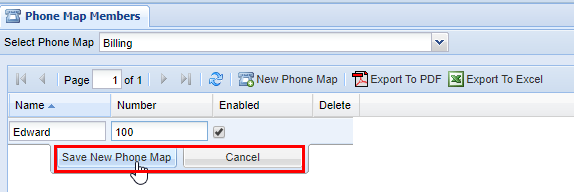
When you are satisfied click **Save New Phone Map** otherwise click cancel. You will see a message stating **Changes Saved** if the number has saved successfully.

[](https://public.intellasoft.net/uploads/images/gallery/2024-07/Fx6image.png)
Repeat the previous steps until you are satisfied. You are able to have an unlimited amount of phone maps added to a **Phone Map Group** however the phone maps are designed for a 1 to 1 configuration, meaning only one number can be active at a time. If you wish to use multiple numbers in a phone map group, you should use a **[Hunt Group](https://public.intellasoft.net/books/web-portal-dL9/page/hunt-groups)** instead.
[](https://public.intellasoft.net/uploads/images/gallery/2024-07/jq6image.png)

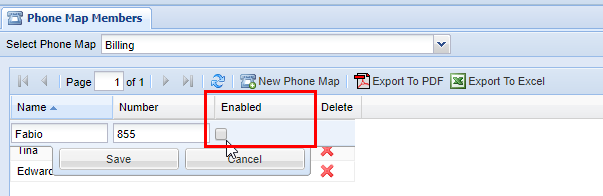
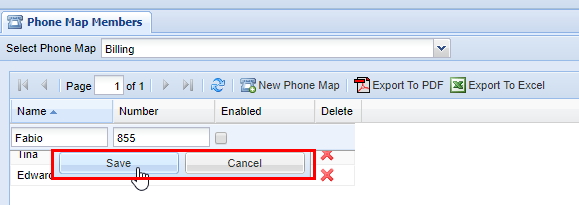
To enable/disable a number, click on the row you wish to modify. Afterwards, check the box to enable or disable the phone map group member. When you're finished click **Save**, you should see a message stating **Changes Saved** after.
[](https://public.intellasoft.net/uploads/images/gallery/2024-07/sFzimage.png)

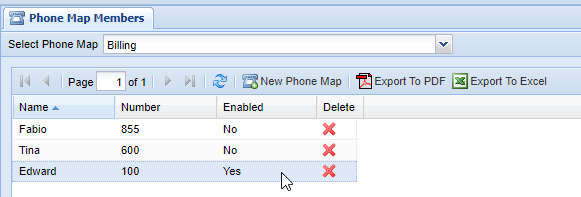
Repeat the previous steps as necessary to ensure that only one phone map member is **enabled**, while the others are disabled. This is indicate by a Yes (for enable) or No (not enabled) in the **Enabled** column.

[](https://public.intellasoft.net/uploads/images/gallery/2024-07/Gnfimage.png)
# Removing a Phone Map Group Member
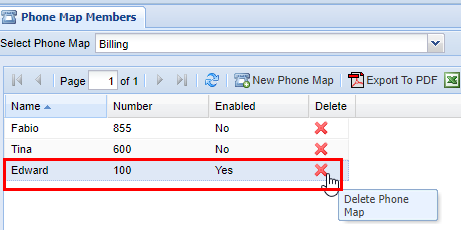
Start by navigating to the **Phone Map Members** screen via the **Navigation Panel.** Select a **Phone Map Group** from the drop down menu following the instructions according **[Group Selection](#bkmrk-group-selection).** Find the **Member** you wish to delete, then simply click on the red X in the **delete** column.
A confirmation pop up will appear confirming your selection. If you wish to delete click **OK**, you will see a message stating **Changes Saved**, if this is not the entry to wish to delete click **Cancel**, to return to the screen. Afterwards, ensure that an appropriate **Member** in the PhoneMap Group is enabled, this will be up to your organizations needs. If you do not enable a member after deleting a member that has been previously enabled (such as the example here), then this **Phone Map Group** will not have an active member available to receive calls. If however, you simply deleted a member that is disabled while another remains enabled, no further action is necessary.
[](https://public.intellasoft.net/uploads/images/gallery/2024-07/hjTimage.png)