# DayNight Schedule

## Overview

The **DayNight Schedule** screen is where you set the schedule for the **[DayNight Groups](https://public.intellasoft.net/books/web-portal-dL9/page/daynight-groups)**. You can set a permanent schedule as well as override periods where the schedule may need to be modified based on the current needs of your organization.

<div class="wiki-content" id="bkmrk-overview-group-selec"><div class="contentLayout2"><div class="columnLayout single" data-layout="single"><div class="cell normal" data-type="normal"><div class="innerCell"><div class="panel conf-macro output-block" data-hasbody="true" data-macro-name="panel" style="border-width: 1px;"><div class="panelContent"><div class="toc-macro client-side-toc-macro conf-macro output-block" data-csslistindent="15px" data-hasbody="false" data-headerelements="H1,H2" data-macro-name="toc" data-numberedoutline="true">- <span class="toc-item-body" data-outline="2">[Group Selection](#bkmrk-group-selection)</span>
- <span class="toc-item-body" data-outline="3">[Adding a Day Schedule](#bkmrk-adding-a-day-schedul)</span>
- <span class="toc-item-body" data-outline="4">[Removing a Day Schedule](#bkmrk-removing-a-day-sched)</span>
- <span class="toc-item-body" data-outline="5">[Adding Additional NightHours](#bkmrk-adding-additional-ni)</span>
- <span class="toc-item-body" data-outline="6">[Adding Additional Day Hours](#bkmrk-adding-additional-da)</span>
- <span class="toc-item-body" data-outline="7">[Removing Additional Day or Night Hours ](#bkmrk-removing-additional-)</span>

</div></div></div></div></div></div></div></div>## Group Selection

Before modifying any **DayNight Schedule**, you must select a **DayNight group** from the top left of the screen.

[![image.png](https://public.intellasoft.net/uploads/images/gallery/2024-07/scaled-1680-/L3fimage.png)](https://public.intellasoft.net/uploads/images/gallery/2024-07/L3fimage.png)

## Adding a Day Schedule

1\) Navigate to the **DayNight Schedule** screen from the **Navigation Panel**.

2\) Choose a **DayNight Group** to modify (see [**Group Selection**](#bkmrk-group-selection))

3\) To add a **Day Schedule** start by clicking **New Schedule** within the **Day Schedule** tab. You can also click on a pre-existing day if you are modifying the permanent **Day Schedule**.

[![daynight-schedule-add1.png](https://public.intellasoft.net/uploads/images/gallery/2024-08/scaled-1680-/daynight-schedule-add1.png)](https://public.intellasoft.net/uploads/images/gallery/2024-08/daynight-schedule-add1.png)

4\) A row editor will appear in the grid with several options.

[![daynight-schedule-add2.png](https://public.intellasoft.net/uploads/images/gallery/2024-08/scaled-1680-/daynight-schedule-add2.png)](https://public.intellasoft.net/uploads/images/gallery/2024-08/daynight-schedule-add2.png)

5\) Select the appropriate day (each day must be set individually), start time, and end time.

6\) After you are finished editing, click **Save New Schedule**. If the changes have been saved successfully you will see a green message saying **Changes Saved**. Repeat the previous steps to add additional days.

## Removing a Day Schedule

1\) Navigate to the **DayNight Schedule** screen from the **Navigation Panel** and choose a **DayNight Group** to modify (as shown in [**Group Selection**](#bkmrk-group-selection)).

2\) Find the correct date to remove, and click on the red **X** under the **Delete** column.

3\) A confirmation pop-up will appear. If you wish to delete, click **OK.** You will see a message stating **Changes Saved.** If this is not the entry to wish to delete click **Cancel**.

[![image.png](https://public.intellasoft.net/uploads/images/gallery/2024-07/scaled-1680-/s4mimage.png)](https://public.intellasoft.net/uploads/images/gallery/2024-07/s4mimage.png)

## Adding Additional Day Hours

1\) Navigate to the **DayNight Schedule** screen from the **Navigation Panel** and choose a **DayNight Group** to modify (as shown in [**Group Selection**](#bkmrk-group-selection)).

2\) Find the **Additional Day Hours** panel located in the middle of the screen.

3\) Click "Add Day Hours" and fill out the start date and time, and the end date and time.

<p class="callout info">If you need to have multiple days of additional hours at specific times (versus all day) you will need to make multiple entries, one for each day.</p>

4\) Click "Save" to add the entry.

[![image.png](https://public.intellasoft.net/uploads/images/gallery/2024-07/scaled-1680-/hx9image.png)
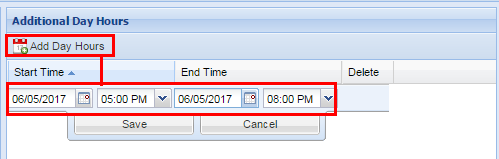
](https://public.intellasoft.net/uploads/images/gallery/2024-07/hx9image.png)

## Adding Additional Night Hours

Adding **Additional Night Hours** is performed the same way as adding **Additional Day Hours** except that you use the Additional Night Hours panel.

[![image.png](https://public.intellasoft.net/uploads/images/gallery/2024-07/scaled-1680-/72limage.png)](https://public.intellasoft.net/uploads/images/gallery/2024-07/72limage.png)

1\) Navigate to the **DayNight Schedule** screen from the **Navigation Panel** and choose a **DayNight Group** to modify (as shown in [**Group Selection**](#bkmrk-group-selection)).

2\) Find the **Additional Night Hours** panel located on the right of the screen.

3\) Click "Add Night Hours" and fill out the start date and time, and the end date and time.

<p class="callout info">If you need to have multiple days of additional hours at specific times (versus all day) you will need to make multiple entries, one for each day.</p>

4\) Click "Save" to add the entry.

## <span class="confluence-embedded-file-wrapper confluence-embedded-manual-size">Example![](https://public.intellasoft.net/download/attachments/8029588/image2017-7-14_9-26-46.png?version=1&modificationDate=1500038806479&api=v2)</span>

Let's say we have a permanent day schedule of Monday through Friday 7:00 AM to 5:00 PM. An event is coming up requiring the selected **DayNight Group** to stay extra on Wednesday and Thursday for 2 hours, from 5:00 PM to 7:00PM. To accomplish this you will have to make two entries, one for each date. The reason for this is if you set a start time for additional hours of Wednesday at 5:00 PM through Thursday at 7:00 PM the entire range of defined hours will indicate that the **DayNight Group** is in **Day Mode**. If the phones are configured to receive calls in **Day Mode** they can potentially receive calls during hours that were not intended to be received (e.g. between 7:00 PM through 7:00 AM the next morning)

After you have ensured that have selected the correct range of hours, click Save. If the changes are successful a message will appear at the top stating **Changes Saved**.

[![image.png](https://public.intellasoft.net/uploads/images/gallery/2024-07/scaled-1680-/9Awimage.png)
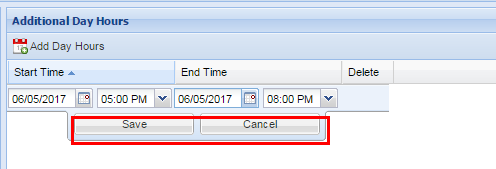
](https://public.intellasoft.net/uploads/images/gallery/2024-07/9Awimage.png)

## Removing Additional Day or Night Hours 

1\) Navigate to the **DayNight Schedule** screen from the **Navigation Panel** and choose a **DayNight Group** to modify (as shown in [**Group Selection**](#bkmrk-group-selection)).

2\) Find the **Additional Day Hours** entry or **Additional Night Hours** entry that you wish to remove.

[![image.png](https://public.intellasoft.net/uploads/images/gallery/2024-07/scaled-1680-/3eXimage.png)](https://public.intellasoft.net/uploads/images/gallery/2024-07/3eXimage.png)<span class="confluence-embedded-file-wrapper confluence-embedded-manual-size">![](https://public.intellasoft.net/download/attachments/8029588/image2017-7-14_9-27-11.png?version=1&modificationDate=1500038831415&api=v2)</span>

3\) From the **Additional Day Hours** or **Additional Night Hours** panel click the **red X** in the **Delete** column.

4\) A confirmation pop-up will appear confirming your selection. If you wish to delete, click **OK.** You will see a message stating **Changes Saved.** If this is not the entry to wish to delete, click **Cancel.**

[![image.png](https://public.intellasoft.net/uploads/images/gallery/2024-07/scaled-1680-/FPiimage.png)
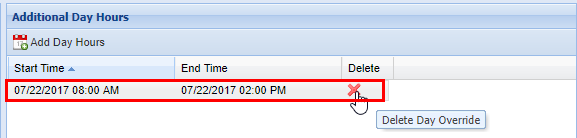
](https://public.intellasoft.net/uploads/images/gallery/2024-07/FPiimage.png)