Extensions
IntellaPhone Setup Instructions
First: Choose Extension or Create New
1) Locate Extensions, and then find the Extension to set as a SoftPhone
or
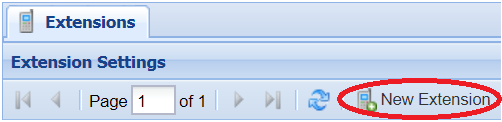
2) Use the 'New Extension' button
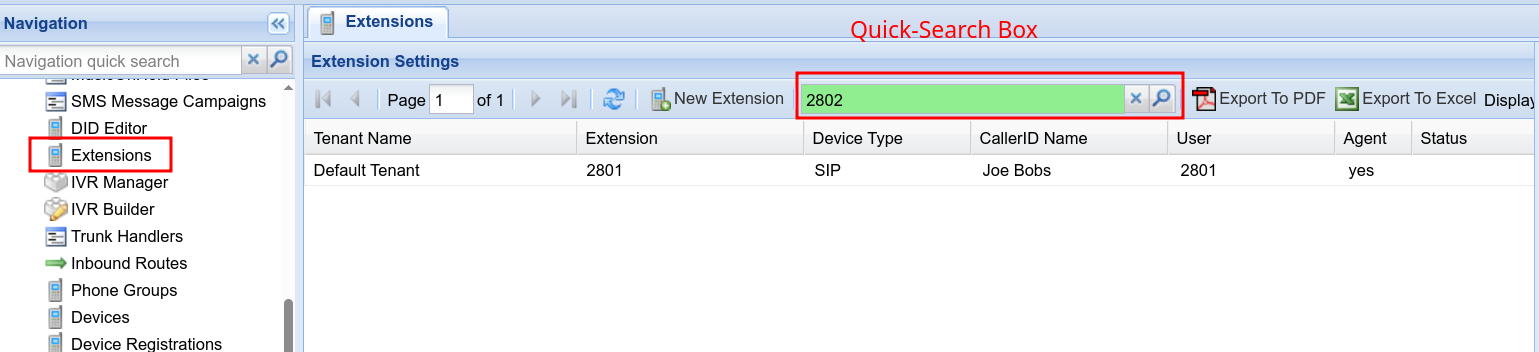
Locate
Create New

Next: Set CallerID Name and Phone Make/Model
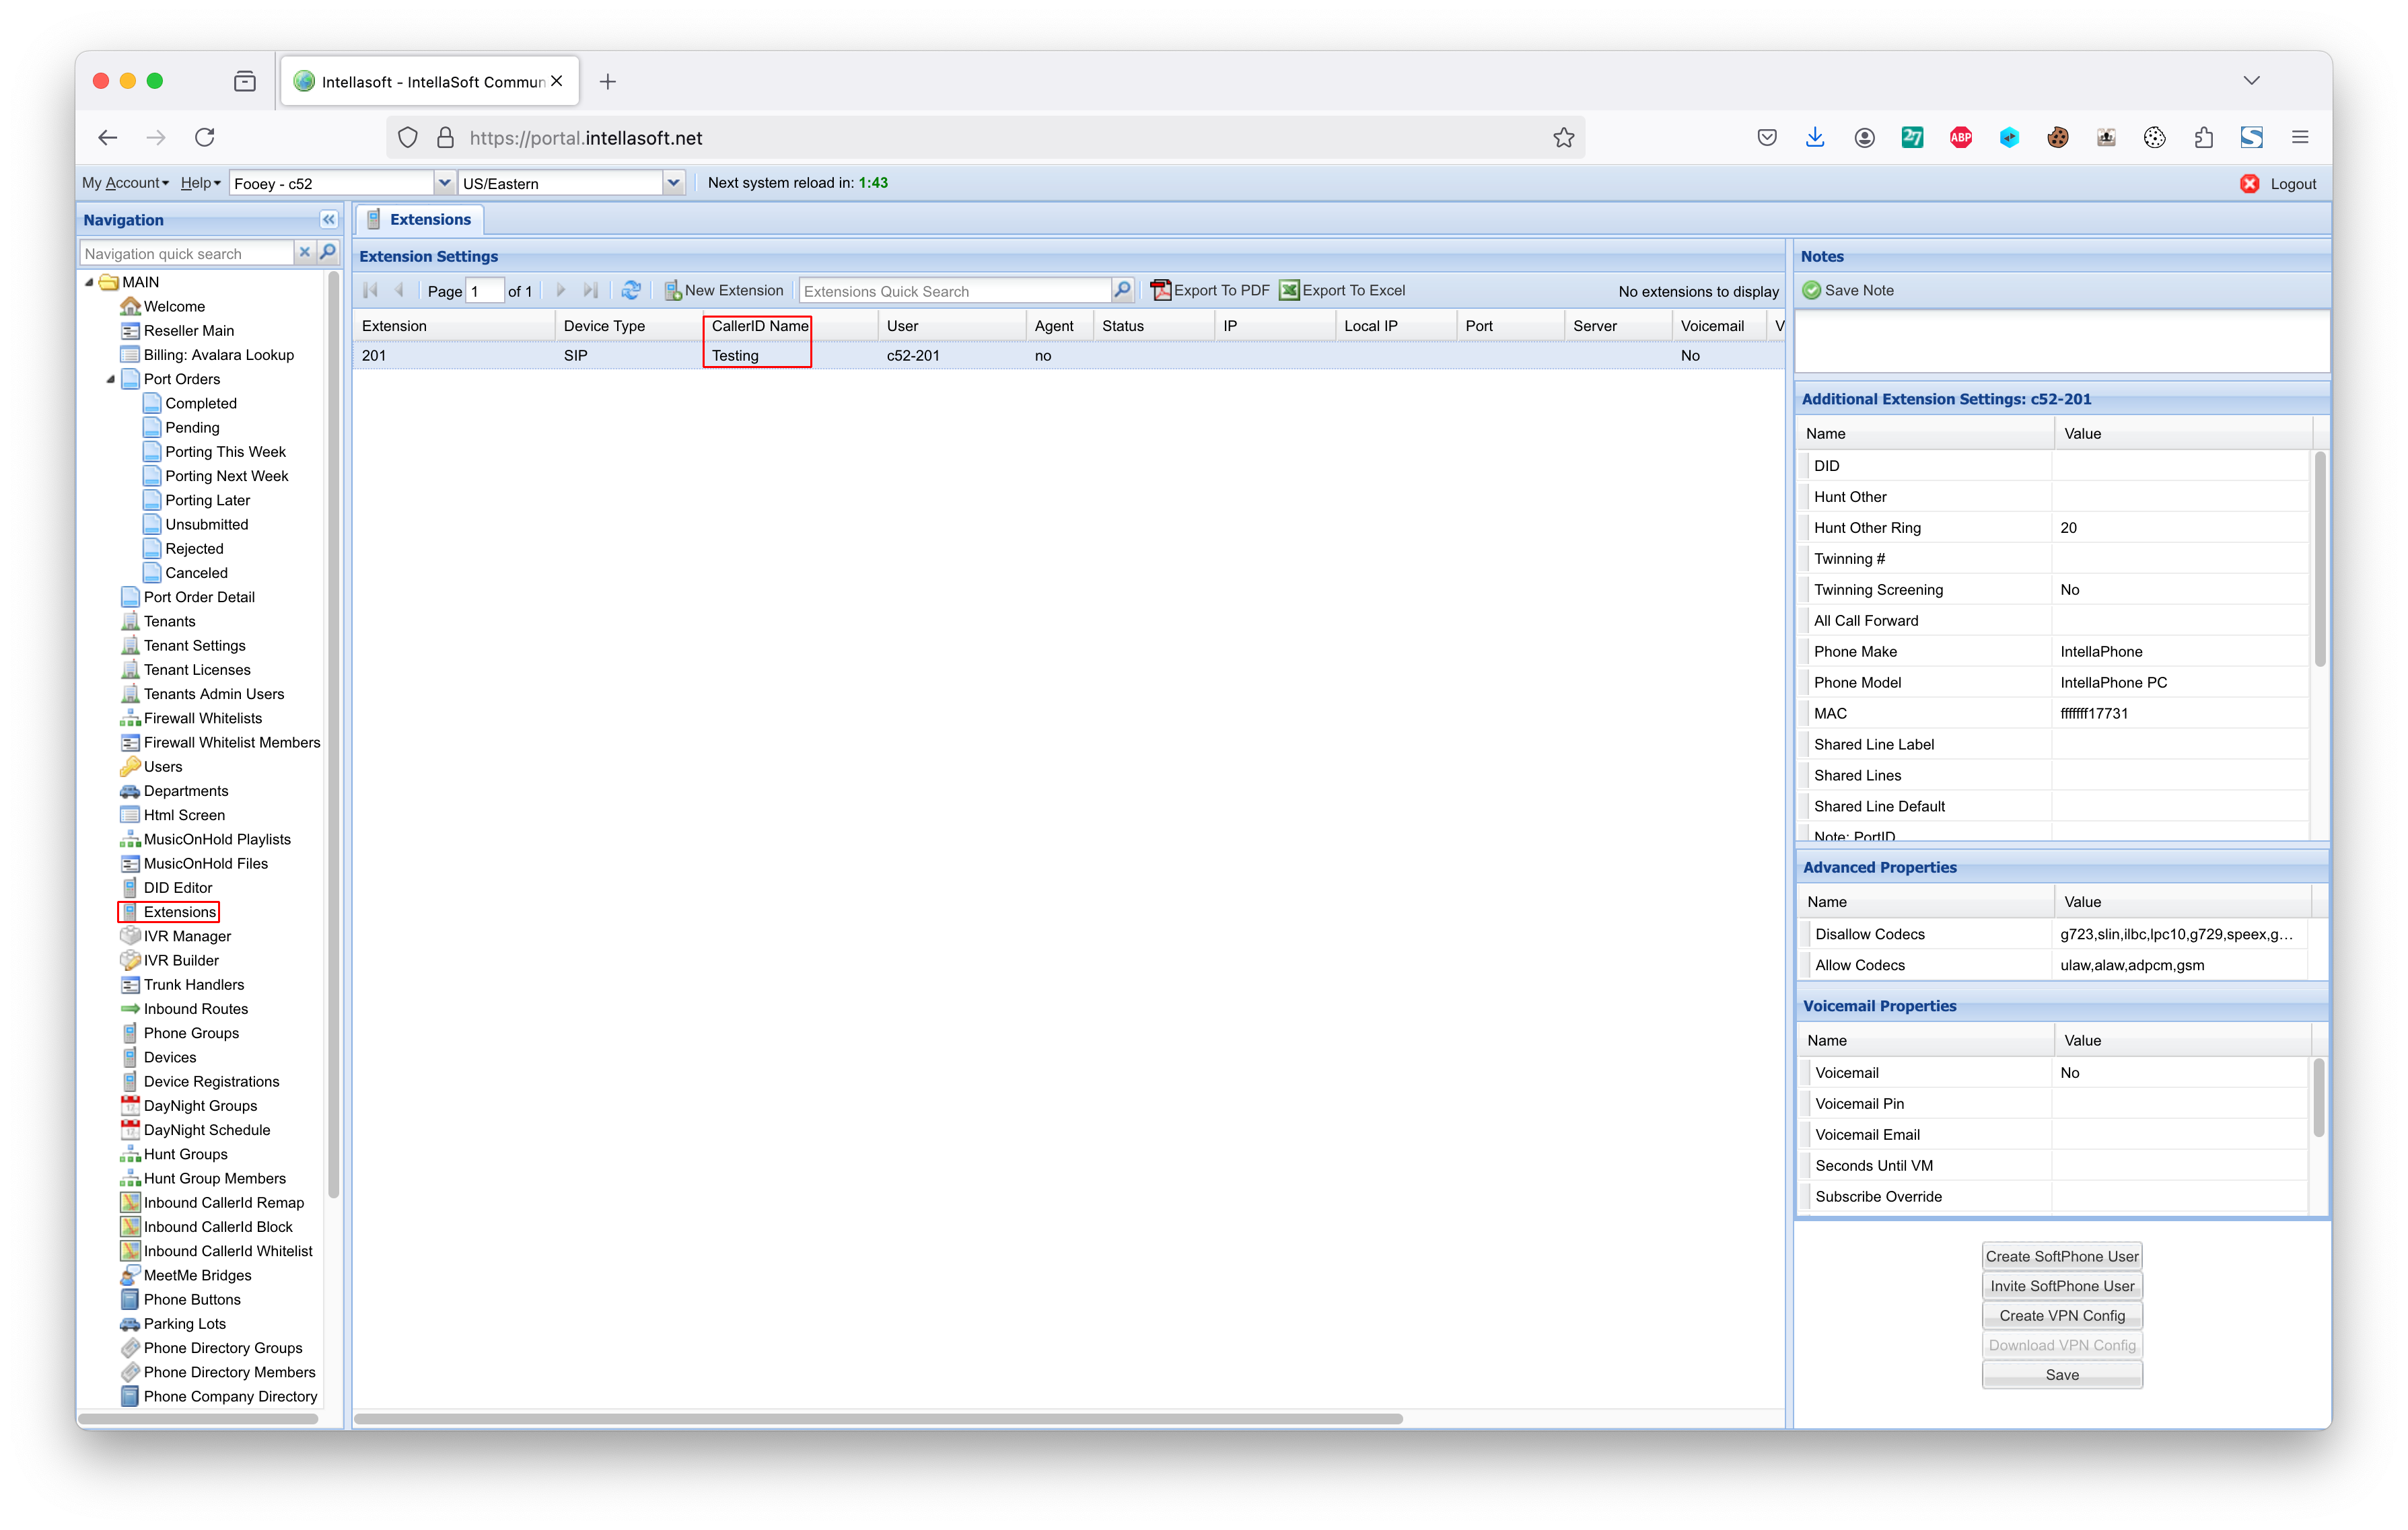
1) Set CallerID name
2) Enable Voicemail (optional)
3) Set Email Address (optional, for voicemail)
4) Set Phone Make: IntellaPhone
5) Set Phone Model: IntellaPhone PC
Second Step: Send the Invitation Email
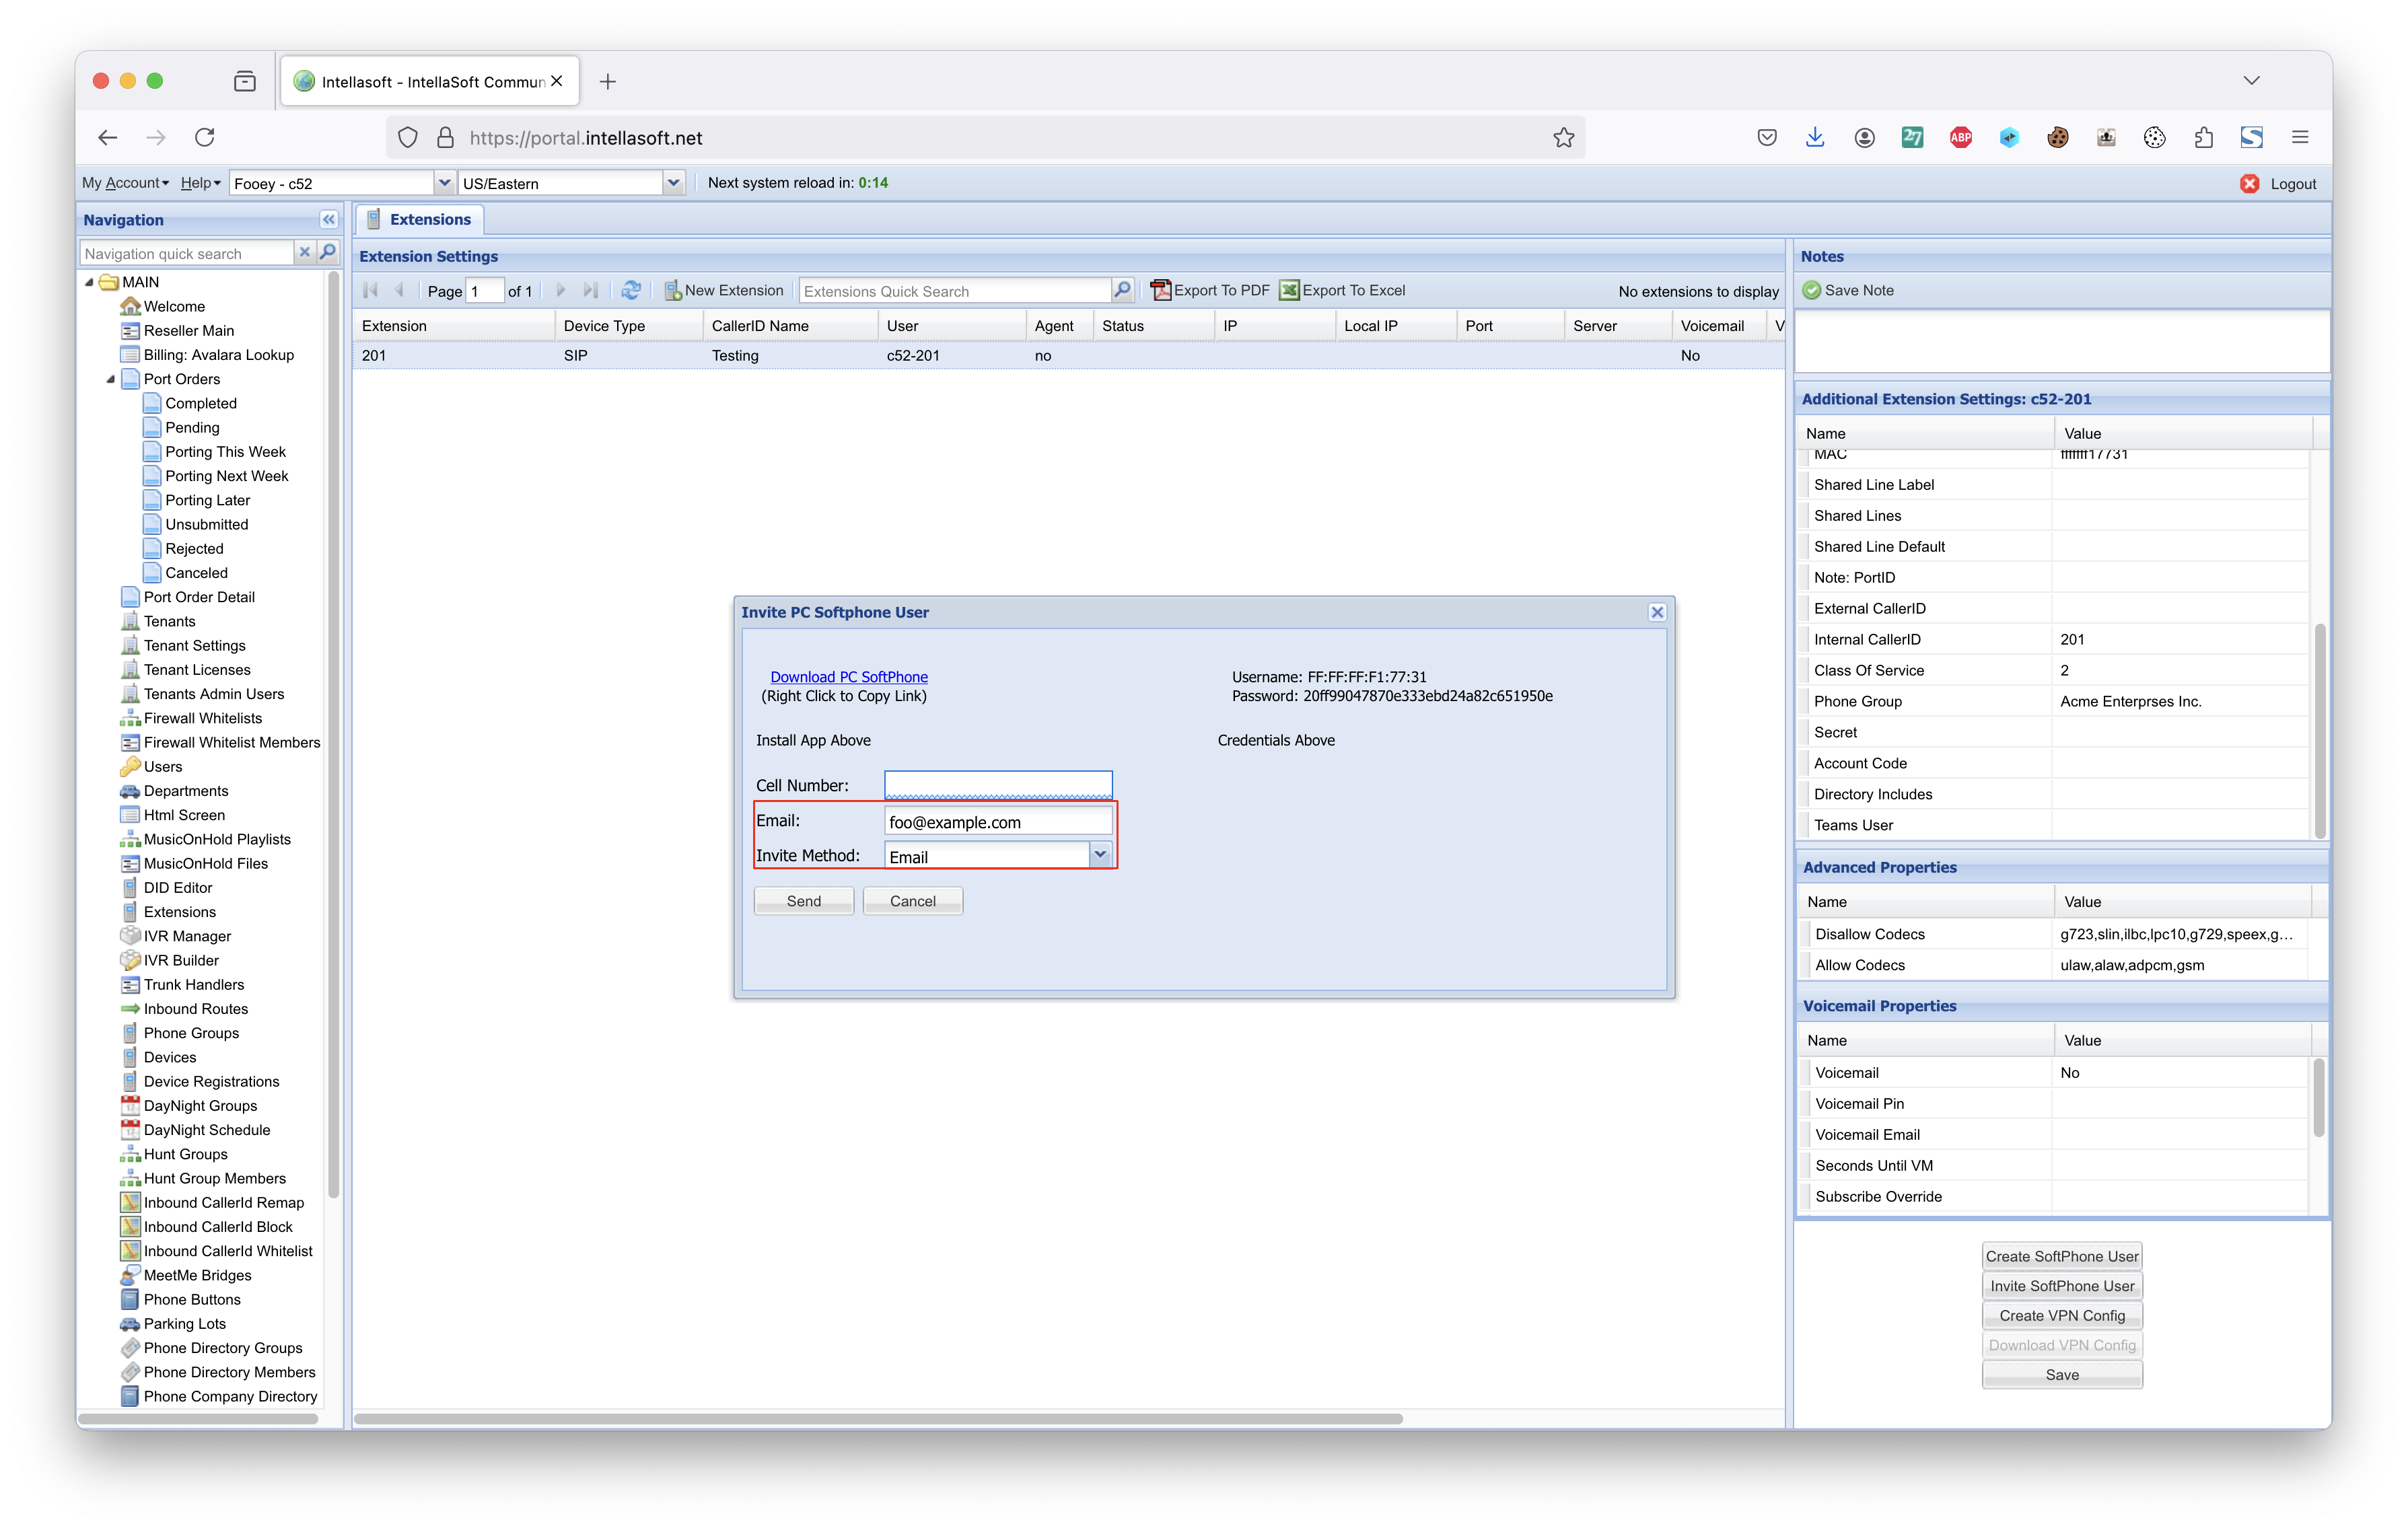
Third Step: Wait for Email to be Sent. This may take 30 seconds or more.
Fourth Step:The user will receive an email that looks like the following

The above link is purely an example. It is important to use the exact link that was sent in the email in order to proceed to the next step.
Fifth Step: The user will visit the URL in the email and install the application
Once installed, the user will then copy and paste the Username and Password into the matching fields of the application logon

1) Download and install the IntellaPhone Application
2) Once installed, copy the Username from this web page into the Username field of the Account Box
3) Followed by, copy the Password from this web page into the Password field of the Account Box
4) Leave 'Remember Details' checked
Extensions (Archive)
The Extensions screen allows you to associate Extensions with phones. A phone must have an Extension associated with them to receive calls. Extensions can be associated with physical phones, soft phones, or voicemail boxes.
Adding an Extension
| Field |
Type |
Description |
|
| Required | Extension | Numeric | Extension number |
| Device Type | List | Type of Device the extension will be associated with | |
| CallerID Name | Field | Caller ID name, this may be overwritten depending on system settings | |
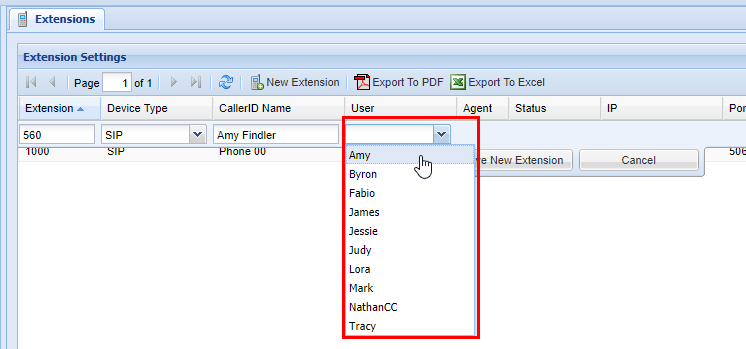
| Optional | User | List | Portal users to be associated with this extension |
| Voicemail | Checkbox | Enables or disables voicemail | |
| Voicemail Pin | Numeric | Pin number to access voicemail, will only show if voicemail has been enabled. | |
| View Only | Agent (further explained below) | Value | Yes/ no value, states whether or not this extension is associated with an Agent (part of the IntellaQueue/call center settings) |
| Status (further explained below) | Value | Status of device registered to server. | |
| IP (further explained below) | Numeric | Internet Protocol address of the extension. | |
| Port (further explained below) | Numeric | Protocol port that the extension residents on |
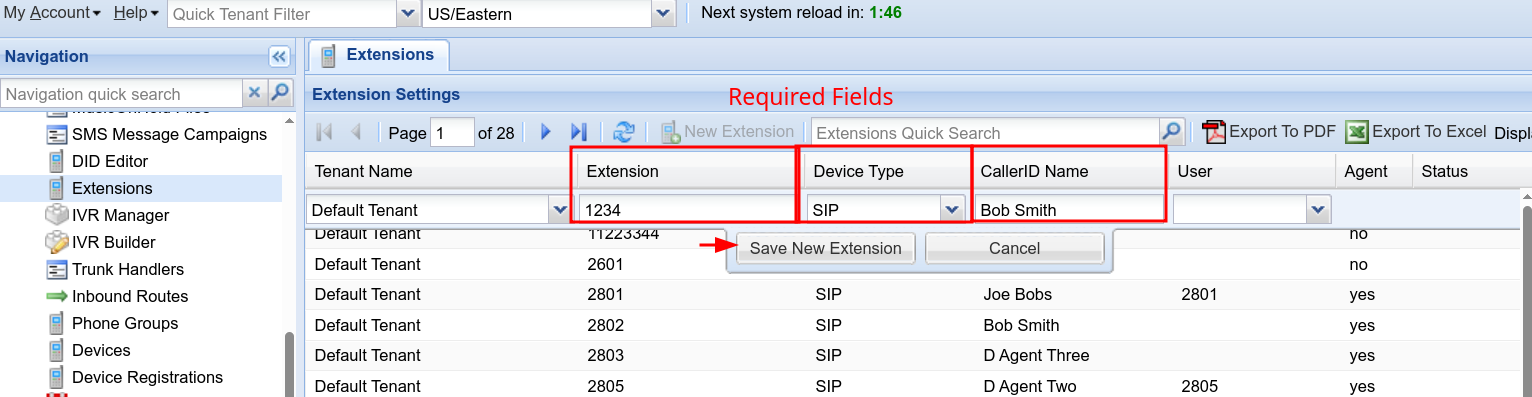
Start by navigating to the Extensions screen via the Navigation Panel. Next click New Extension button. A row editor will appear in the grid below.
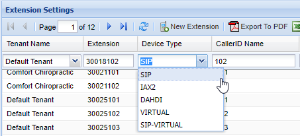

The following options will be dependent on your organizations needs, so it is important to consult with your system administrator during your initial setup of your IntellaSoft web portal, or making any changes thereafter. Start by adding an appropriate Extension number, afterwards select the type of device you are creating the extension form. Several options are available from the drop down men.
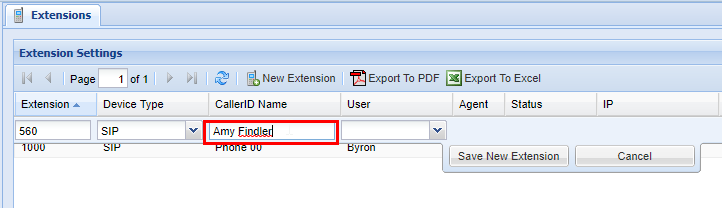
Afterwards, select a CallerID Name, this is what will appear when this extension attempts to call others within the organization.

SITUATION DEPENDENT: If the Extension you are adding will also have a User that requires permission access (see Users page for more information on configuring users), select the appropriate User from the drop down menu. If this does not apply skip to step 6.

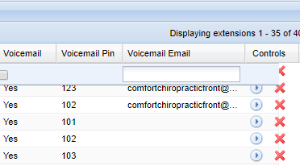
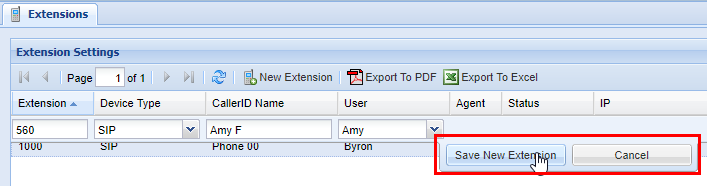
At this point, you will also have the option to setup a voicemail for the Extension. If the extension does not require a voicemail go ahead and click Save New Extension (if you go ahead and save you will see a message stating Changes Saved); otherwise move on to step 7. To enable voicemail, click the checkbox in the Voicemail column, afterwards select a numerical PIN for the voicemail, we recommenced something memorable between 4-8 digits.


Next, you also have the option to have voicemail notifications and recording sent to email, in the following box simply input the desired email address that voicemail recordings and notifications can be sent to. Important: Ensure that the email address you have inserted is correct.


Lastly; review all of the information submitted from Extension Number to Voicemail Email, once you have ensured all of the data is correct and accurate click Save New Extension. Afterwards you will see a message stating Changes Saved.

There are several important limitations to keep in mind regarding Extension.
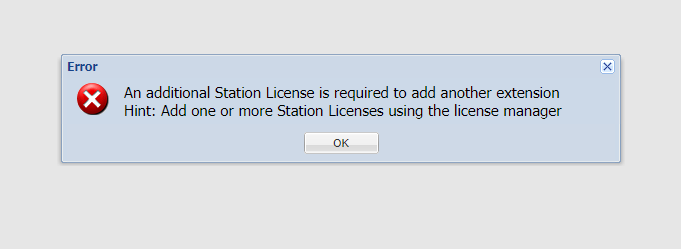
Firstly, the number of Extensions depends on the licensing of your IntellaSoft web portal. Depending on the number purchased during your initial setup of your IntellaSoft system you may need to be purchase additional licenses to gain access to more extensions. We are working on a way to make this process seamless, but for now you will need contact your IntellaSoft Sales representative who will be more than happy to assist you during that process. If you see an error such as the one below, this means you have reached the maximum number of Extensions your licenses allow for.

Next, you may have noticed 4 columns with information that you cannot edit. This is simply information that the IntellaSoft web portal is reading from the server, and are explained below.

Agent: In this column it will simply state Yes or No. Agents are are specific the Call Center options of IntellaSoft Web Portal. This information is helpful in large organizations with multiple departments including ones that have a dedicated call center with live Agents, whether or not an Extension is identified as an agent depends on your licensing configuration and organizations needs. If you are needing add a call center to your IntellaSoft Communications Platform, contact your IntellaSoft representative to discuss options.
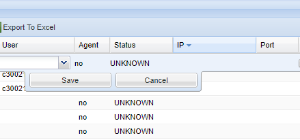
Status: See the table below
| Status |
Definition |
| OK | The end-point is registered and properly running on the server (you should see an IP and Port associated with the extension). An end-point can represent a physical phone, software phone, PA speaker, as well numerous other physical or virtual communication devices. |
| UNREACHABLE | The system cannot reach the phone, but the phone has been registered prior. This usually indicates that there may be an issue. Contact your system administrator for assistance. |
| UNKNOWN | This will be the status of the endpoint when it was previously UNREACHABLE, and the system has given up trying to contact the endpoint. |
| UNMONITORED | This means that the endpoint has intentionally been set so it does not monitor status. The IP and PORT will only be populated if these are configured. Despite being Unmonitored, the endpoint can still be called. When this endpoint is called, the system will try to reach it until the system defined timeout is reached. If the endpoint is unresponsive at the time of the call, the call will fail. |
| BLANK | No phone has been registered to this extension. There could be several reasons for this, the phone could simply not be plugged in or programmed to this extension. The Contact your system administrator if you suspect a problem. |
IP: This columns refers to the IP (or Internet Protocol) Address that the extensions lies on. This information is automatically updated based on the current server information. Generally speaking this is utilized by IntellaSoft staff, your organizations IT or System Administration to diagnose potential problems, should they arise. If you have questions regarding this, please direct them to your System Administrator. IP of the phone itself
Port: Port that the phone resides on.

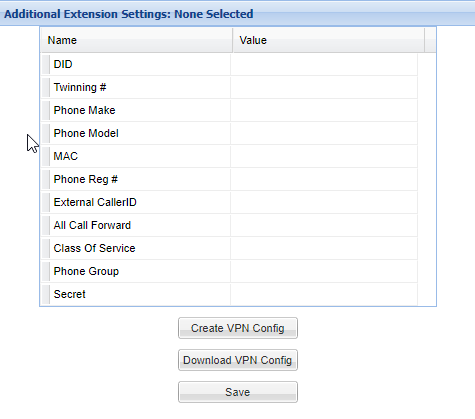
Additional Extension Settings
Extensions may have to have additional information about them, this will depend on your organizations needs. Contact your system administrator for more information.
| Name |
Definition |
| DID | Inbound DID |
| Twinning # |
Twinning number. Ring an external number such as a cell phone. |
| Phone make | Make of the phone in question |
| Phone Model | Model of the phone in question |
| MAC | MAC address of the phone, if registered to a physical phone |
| Phone Reg # | Registration number on the physical phone (ie: polycom reg number) |
| External CallerID |
What callerid to use when the extension dials out a route |
| All Call Forward |
Call forwarding |
| Class of Service | Class of service when this extension makes a call |
| Phone Group | Phonegroup that this extension is a member of |
| Secet | Secret password to use for incoming and outgoing requests, unless overridden using 'auth' |
Removing an Extension
Warning
Caution should always be exercised when removing an Extension. Even if an extension is not physically used and thought to be inactive, or it is not connected -- the associated voicemail box might be being used elsewhere in the system, or the extension may have a [Call Forward] in place. Ensure that it is verified that all functions related to this extension are unused or unneeded before removing.
A confirmation pop up will appear confirming your selection. If you wish to delete click OK, you will see a message stating Changes Saved, if this is not the entry to wish to delete click Cancel, to return to the screen.

Overview
An extension is an assignment to a physical phone, softphone, voicemail box, or any similar device configured within the system. A phone must have an extension assigned to it to receive calls.
A user cannot configure his or her extension. Only an administrator can update an extension.
Configuration Options
| Field |
Type |
Description |
Required |
||||||||||||
| Extension | Alphanumeric |
Extension identifier
Numeric digits are recommended if the extension must be dialed from a phone. |
Yes |
||||||||||||
| Device Type | List |
Extension device type
VIRTUAL and SIP-VIRTUAL device types do not use extension licenses |
Yes |
||||||||||||
| CallerID Name | Field |
Caller ID name – displayed on devices that support caller ID |
Yes | ||||||||||||
| User | List |
The portal user associated with the extension (refer to Users for more information) – select if a specific user requires permission to access
VIRTUAL and SIP-VIRTUAL device types do not use extension licenses. |
Yes |
||||||||||||
| Agent | Value |
Indicates if the extension is associated with an agent |
Read-only | ||||||||||||
| Status |
Value |
Status of the device registered to the server
|
Read-only |
||||||||||||
| IP | Numeric |
Internet protocol address (IPv4 format – e.g. 255.255.255.255) assigned to the extension |
Read-only | ||||||||||||
| Port | Numeric |
Device signaling port |
Read-only | ||||||||||||
| Voicemail | Checkbox | Enables or disables voicemail | No | ||||||||||||
| Voicemail Pin | Numeric |
Voicemail PIN – enabled if voicemail is enabled |
Yes if voicemail is enabled | ||||||||||||
| Voicemail Email |
Email address where voicemail messages are sent – enabled if voicemail is enabled |
No | |||||||||||||
| Controls |
n/a |
Extension tools
|
n/a |


Additional Configuration
Some extensions require additional configuration, depending on your organizational needs. These configuration options are described under Phone Configuration. Contact your system administrator for more information.
Adding an Extension
1) Click Extensions on the Navigation pane. The Extension Settings pane appears.
2) Click New Extension on the upper menu.
3) Enter the fields as required. Refer to Configuration Options above.
4) Click Save New Extension.
The new extension has been added.
Editing an Extension
1) Click Extensions on the Navigation pane. The Extension Settings pane appears.
2) Double-click the extension row you want to edit. You should see a row editor.
3) Make any desired edits. Refer to Configuration Options above.
4) Click Save.
Deleting an Extension
Warning: Even if an extension is inactive or disconnected, it may have call forwarding enabled, or the associated voicemail box may be used elsewhere. Ensure all functions related to the extension are unused before removing it.
1) Click Extensions on the Navigation pane. The Extension Settings should appear.
2) Under the Controls column, click the red X for the extension you want to delete.
3) Click OK to delete the extension.
Additional Notes
- The number of available extensions depends on your IntellaSoft licensing. You may need to purchase additional licenses to add more extensions. Contact your IntellaSoft sales representative for more information.