| **Field** | **Type** | **Description** |
| First Name\* | Field | First name of User |
| Last Name\* | Field | Last name of User |
| Email\* | Field | Email address of the user (for logging in) |
| Phone Number | Phone Number # | User's phone number (direct line, cell phone, etc.) |
| Pin | Numerical | Always recommended; pin number to login into web portal |
Note: The screenshot below is from a demo system so the full phone number and email have been blurred out for privacy reasons.
[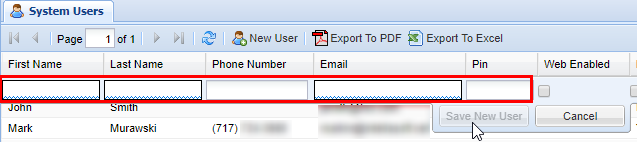](https://public.intellasoft.net/uploads/images/gallery/2024-08/ZXJimage.png) 4\) Next, set the permissions for the **User** in question. The individual permissions are defined in the table below. 5\) Once you have set the desired permission for a user click the button labeled **Save New User,** you will see a message stating **Changes Saved**, indicating the user has been successfully saved. If you need to edit a **User's** setting click on the entry from the editor to make changes accordingly.| Permission | Description |
| Web Enabled | Check for the user to have access to the web portal (this in the majority of cases should be checked). |
| Manager | Can only edit pre-existing conferences. |
| Admin | Access to all elements of the IntellaConference web portal such as creating contacts, creating and modifying conferences. |
| Access Users | Has access to the users screen and is able to make changes. |
| Create Recur | User has ability to create recurring conference bridges. |
Note: You must have the required settings entered to be able to save, additionally it should also be noted that each user must have their own unique PIN.
## Removing a System User To remove a web portal **User** click on the red **X** under the delete column corresponding to the **User** you wish to delete. A confirmation pop-up will appear confirming that this is the **User** you wish to delete, click **OK**. You will see a message stating **Changes Saved.** [](https://public.intellasoft.net/uploads/images/gallery/2024-08/5xVimage.png) # Personal Contacts ## Overview This section covers adding contacts that can be quickly added to new conference rooms. The personal contacts included are specific to the **User's** account that is logged into the web portal, so depending on the **User's** permission they may or may not be able to view or modify other people's contacts. ## Adding a New Personal Contact 1\) Start by navigating to the **Personal Contact** screen from the navigation panel. 2\) Next, click the **New Contact** button and enter the information as defined in the table below. [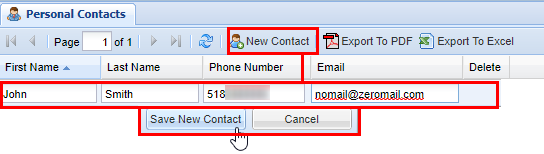](https://public.intellasoft.net/uploads/images/gallery/2024-08/5kDimage.png)| **Field** | **Type** | **Description** | |
| **Required** | First Name | Field | First name of Contact |
| Last Name | Field | Last Name of Contact | |
| Field | Email address of Contact (for notification) | ||
| **Optional** | Phone Number | Numerical Phone Number | Phone number of contact (as shown on their Caller ID) |
| **Field** | **Type** | **Description** | |
| **Required** | First Name | Field | First name of Contact |
| Last Name | Field | Last Name of Contact | |
| Field | Email address of Contact (for notification) | ||
| **Optional** | Phone Number | Numerical Phone Number | Phone number of contact (as shown on their Caller ID) |
| **Field** | **Type** | **Description** |
| Conference Room | Numerical Field | Conference room number (this will be used later to access the conference). |
| Conference Name | Field | Descriptive name of the conference room. |
| Max Participants | Drop Down | Number of max participants that can join the conference. |
| Conference Type | Drop Down | Type of conference; private, restricted, or open. |
| Start Date | Calendar | Date that the conference will be active. |
| Start Time | Drop Down Time | Time the conference will be active (15-minute intervals, 12-hour clock). |
| Buffer Time | Drop Down Time | Time that the conference will be available before the start time (5 or 10 minutes). |
| Duration | Drop Down Time | Time the conference will remain active (15-minute intervals). |
| Recurring | Drop Down | How often the conference will occur at the exact time. |
| Recurring End | Calendar | Date the recurring conference will end. |
| Lecture Mode | Checkbox | Only the leader is able to speak, other participants are muted. |
| Leader Required | Checkbox | If checked the leader must join for the conference to start, otherwise starts when the first participant joins. |
| Automute Mode | Checkbox | Participants are muted upon joining. |
| Auto Recording | Checkbox | Recording starts upon the second person joining. |
| Create | Button | Creates the conference assuming all requirements have been met. |
| **Item** | **Function** | **Type** | **Description** |
| 1 | User Editor | Button | Jumps to the System Users screen. |
| 2 | Contact Editor | Button | Jumps to the ??? screen. |
| 3 | Quick Find | Search Field | Search Available Participants |
| 4 | Available participants | Value | Shows available contacts from personal contacts, corporate directory, and the System Users screen |
| 5 | Include | Button | Includes Available Contact |
| **Function** | **Type** | **Description** |
| Exclude | Button | Removes a Participant from Included to Available. |
| Name | Value | Name of the contact/user. |
| Contact | Value | Defines whether Participant is a contact or a user. |
| Leader | Checkbox | Defines whether or not Participant is a leader, **Required** for **Leader Mode** and **Lecture Mode.** |
| Moderator | Checbkox | Defines whether or not Participant has options for managing the conference call. |
| Notify | Checkbox | Defines whether or not Participants is to be notified when using Notification button. |
| Pin | Button/Pin | When press gives the participant a random Pin number for accessing the conference, after pressing the pin will be shown for future reference. |
| **Field** | **Type** | **Description** |
| Conference Room | Numerical Field | Conference room a number (this will be used later to access the conference). |
| Conference Name | Field | Descriptive name of the conference room. |
| Max Participants | Drop Down | Number of max participants that can join the conference. |
| Conference Type | Drop Down | Type of conference; private, restricted or open. |
| Start Date | Calendar | Date that the conference will be active. |
| Start Time | Drop Down Time | Time the conference will be active (15 minute intervals, 12 hour clock). |
| Buffer Time | Drop Down Time | Time that the conference will be available before the start time (5 or 10 minutes). |
| Duration | Drop Down Time | Time the conference will remain active (15 minute intervals). |
| Recurring | Drop Down | How often the conference will occur at the exact time. |
| Recurring End | Calendar | Date the recurring conference will end. |
| Lecture Mode | Checkbox | Only the leader is able to speak, other participants are muted. |
| Leader Required | Checkbox | If checked the leader must join for the conference start, otherwise starts when first participant joins. |
| Automute Mode | Checkbox | Participants are muted upon joining. |
| Auto Recording | Checkbox | Recording starts upon the second person joining. |
| Save | Button | Saves the conference assuming all requirements have been met. |
| **Item** | **Function** | **Type** | **Description** |
| 1 | User Editor | Button | Jumps to the **System Users** screen. |
| 2 | Contact Editor | Button | Jumps to the **Personal Contacts** screen. |
| 3 | Quick Find | Search Field | Search Available Participants. |
| 4 | Available participants | Value | Shows **available** contacts from personal contacts, corporate directory, and the **System Users** screen. |
| 5 | Include | Button | Includes **Available Contact.** |
| Exclude | Button | Removes a Participant from Included to Available. |
| Name | Value | Name of the contact/user. |
| Contact | Value | Defines whether Participant is a contact or a user. |
| Leader | Checkbox | Defines whether or not Participant is a leader, **Required** for **Leader Mode** and **Lecture Mode.** |
| Moderator | Checbkox | Defines whether or not Participant has options for managing the conference call. |
| Notify | Checkbox | Defines whether or not Participants is to be notified when using Notification button. |
| Pin | Button/Pin | When press gives the participant a random Pin number for accessing the conference, after pressing the pin will be shown for future reference. |
| **Field** | **Description** |
| Start Time | Time the conference will become active |
| Name | Descriptive name of the conference room. |
| Duration | Time the conference will remain active (15 minute intervals). |
| Buffer | Time that the conference will be available before the start time (5 or 10 minutes). |
| Recurring | How often the conference will occur at the exact time. |
| Recur End | Date the recurring conference will end. |
| Conference Room | Conference room a number (this will be used later to access the conference). |
| Lecture | Only the leader is able to speak, other participants are muted. |
| Leader | Yes / No Leaders Mode |
| Recording | Yes / No Recording |
| Max Participants | Number of max participants that can join the conference. |
| Added By | User the conference was created by. |
| Controls | First Button takes you to edit Conference, Second Button Red X prompts to delete Conference |
| 1 | Start Date | Select a start date for the conference to be open from a calendar menu. |
| 2 | Max Participants | Sets the maximum number of parties that can connect to a conference (currently 50 is the maximum). |
| 3 | Duration | Duration the conference will be reserved for (open to join, and active). |
| 4 | Start Time | Sets the time that the confernece will be open (15 minute increments, 12 hour AM/PM format). |
| 5 | Conference Type | Sets the conference to Open (anyone can join), Private (only users have a pin can join), Restricted (users must have a pin and be added to conference contacts from the web portal). |
| 6 | Create | Finalizes the initial set of settings and will take you to **Edit Conference** screen for further options. |