IntellaConference
- System Users
- Personal Contacts
- Company Directory
- New Conference
- Edit Conference
- Conferences
- Conference Logs
- Overview
- Active Conferences
System Users
Overview
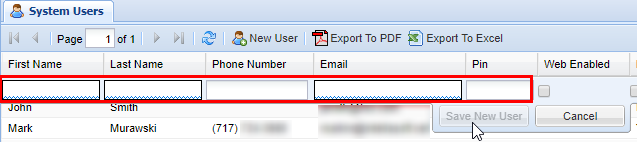
The System Users screen is specifically meant for creating web portal accounts for Users to access and manage IntellaConference functions. Similar to the core Intellasoft Users screen, you will have the options for adding individual users and the ability to manage their permissions within the IntellaConference web portal.
Adding a New System User
2) Click the New User button. The table below represents the available settings for creating a new User. The permission options will be covered in a later step. (* Indicates a required field)
| Field |
Type |
Description |
| First Name* | Field | First name of User |
| Last Name* | Field | Last name of User |
| Email* | Field | Email address of the user (for logging in) |
| Phone Number | Phone Number # | User's phone number (direct line, cell phone, etc.) |
| Pin | Numerical | Always recommended; pin number to login into web portal |
3) Once you have entered the required options, click the Save New User button. You will see a message stating Changes Saved.
Note: The screenshot below is from a demo system so the full phone number and email have been blurred out for privacy reasons.
4) Next, set the permissions for the User in question. The individual permissions are defined in the table below.
5) Once you have set the desired permission for a user click the button labeled Save New User, you will see a message stating Changes Saved, indicating the user has been successfully saved. If you need to edit a User's setting click on the entry from the editor to make changes accordingly.
| Permission |
Description |
| Web Enabled | Check for the user to have access to the web portal (this in the majority of cases should be checked). |
| Manager | Can only edit pre-existing conferences. |
| Admin | Access to all elements of the IntellaConference web portal such as creating contacts, creating and modifying conferences. |
| Access Users | Has access to the users screen and is able to make changes. |
| Create Recur | User has ability to create recurring conference bridges. |

Note: You must have the required settings entered to be able to save, additionally it should also be noted that each user must have their own unique PIN.
Removing a System User
To remove a web portal User click on the red X under the delete column corresponding to the User you wish to delete. A confirmation pop-up will appear confirming that this is the User you wish to delete, click OK. You will see a message stating Changes Saved. 

Personal Contacts
Overview
This section covers adding contacts that can be quickly added to new conference rooms. The personal contacts included are specific to the User's account that is logged into the web portal, so depending on the User's permission they may or may not be able to view or modify other people's contacts.
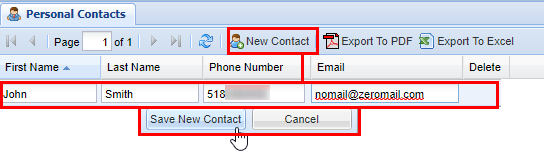
Adding a New Personal Contact
1) Start by navigating to the Personal Contact screen from the navigation panel.
2) Next, click the New Contact button and enter the information as defined in the table below.
| Field |
Type |
Description |
|
| Required | First Name | Field | First name of Contact |
| Last Name | Field | Last Name of Contact | |
| Field | Email address of Contact (for notification) | ||
| Optional | Phone Number | Numerical Phone Number | Phone number of contact (as shown on their Caller ID) |
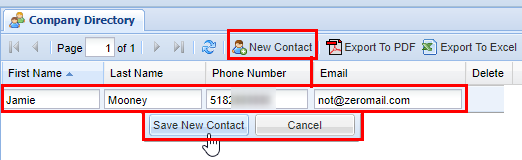
3) Click the Save New Contact button. Afterwards, you will see a message stating Changes Saved.
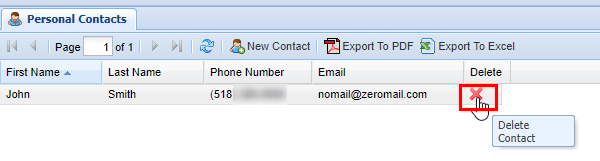
Removing a Personal Contact
1) Click on the red X under the delete column corresponding to the Personal Contact you wish to delete.
2) A confirmation pop-up will appear confirming that this is the Personal Contact you wish to delete. Click OK. Afterwards, you will see a message stating Changes Saved.
Company Directory
Overview
This section is about adding contacts that are accessible to everyone who has access to the IntellaConference web portal.
Adding a Company Directory Contact
1) Start by navigating to the Company Directory screen from the navigation panel.
2) Next, click the New Contact button and enter the information as defined in the table below.
| Field |
Type |
Description |
|
| Required | First Name | Field | First name of Contact |
| Last Name | Field | Last Name of Contact | |
| Field | Email address of Contact (for notification) | ||
| Optional | Phone Number | Numerical Phone Number | Phone number of contact (as shown on their Caller ID) |
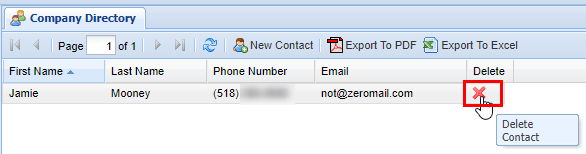
Removing a Company Directory Contact
1) Find the contact that you wish to remove.
2) Click the red X under the delete column.
3) Click OK on the confirmation dialog to confirm the deletion.
New Conference
Overview
This screen is dedicated to creating new conference bridges as well as managing the users who can join those conferences. It should be noted that this screen is not for editing pre-existing conferences, if you need to edit pre-existing conferences check out the Edit Conference page.
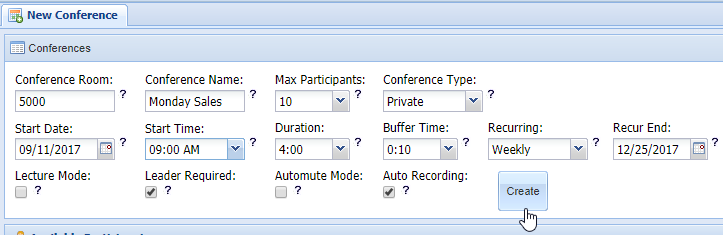
Creating a New Conference
2) Fill out the options (see the table below for more information)
3) If you are creating an Open conference (selected via the Conference Type option), you can press the Create button and you will see a message stating Changes Saved.
4) If you have selected the mode Leader Mode, Lecture Mode, or Restricted or Private Mode, then move on to the next step Conference Participants.

| Field |
Type |
Description |
| Conference Room | Numerical Field | Conference room number (this will be used later to access the conference). |
| Conference Name | Field | Descriptive name of the conference room. |
| Max Participants | Drop Down | Number of max participants that can join the conference. |
| Conference Type | Drop Down | Type of conference; private, restricted, or open. |
| Start Date | Calendar | Date that the conference will be active. |
| Start Time | Drop Down Time | Time the conference will be active (15-minute intervals, 12-hour clock). |
| Buffer Time | Drop Down Time | Time that the conference will be available before the start time (5 or 10 minutes). |
| Duration | Drop Down Time | Time the conference will remain active (15-minute intervals). |
| Recurring | Drop Down | How often the conference will occur at the exact time. |
| Recurring End | Calendar | Date the recurring conference will end. |
| Lecture Mode | Checkbox | Only the leader is able to speak, other participants are muted. |
| Leader Required | Checkbox | If checked the leader must join for the conference to start, otherwise starts when the first participant joins. |
| Automute Mode | Checkbox | Participants are muted upon joining. |
| Auto Recording | Checkbox | Recording starts upon the second person joining. |
| Create | Button | Creates the conference assuming all requirements have been met. |
Participant Management
Available Participants
This panel includes Participants that can potentially be added to the Conference in question, note that this panel is only useful if the conference in question has any of the following options selected;
- Lecture Mode - Only the leader of the conference can speak
- Leader Required - The leader must join to start the conference.
- Restricted Conference Type - Only included participants with a valid pin can join.
- Private - A user with any valid pin can join.
All of the previous options are configured here and in the Included Participants panel on the right (more information on this below). To add and manage Participants follow the options in the accordance to the table below. After you have added the desired Participants move on to the next section Included Participants.
Note
Names that are highlighted in blue are Contacts while those that are not highlighted are System Users, this is also shown as a Yes or No under the Contact column.


| Item |
Function |
Type |
Description |
| 1 | User Editor | Button | Jumps to the System Users screen. |
| 2 | Contact Editor | Button | Jumps to the ??? screen. |
| 3 | Quick Find | Search Field | Search Available Participants |
| 4 | Available participants | Value | Shows available contacts from personal contacts, corporate directory, and the System Users screen |
| 5 | Include | Button | Includes Available Contact |
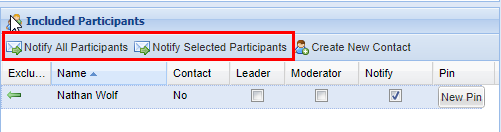
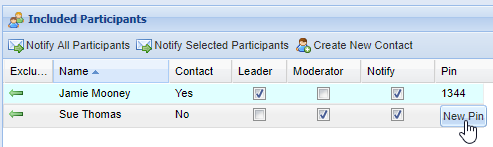
Included Participants
This panel includes Participants that have been included in the conference in question. As stated previously this is only effective if the conference has certain options set beforehand. In addition to the options included in the column there are also a few buttons that have specific functions as well, as explained below.

| Function |
Type |
Description |
| Exclude | Button | Removes a Participant from Included to Available. |
| Name | Value | Name of the contact/user. |
| Contact | Value | Defines whether Participant is a contact or a user. |
| Leader | Checkbox | Defines whether or not Participant is a leader, Required for Leader Mode and Lecture Mode. |
| Moderator | Checbkox | Defines whether or not Participant has options for managing the conference call. |
| Notify | Checkbox | Defines whether or not Participants is to be notified when using Notification button. |
| Pin | Button/Pin | When press gives the participant a random Pin number for accessing the conference, after pressing the pin will be shown for future reference. |
Notifying Participants
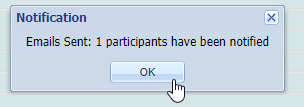
You are able to notify participants via email with meeting details as well their meeting pin. To setup a template for emailing participants check out the Configuration screen (coming soon). To notify all the of participants included in a conference click the Notify All Participants Button, alternatively if you wish to select a specific set up of participants , check the Notify box located in the Notify column. When you press either buttons a pop up message will appear stating how many participants have been notified.


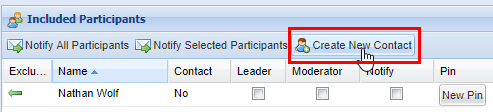
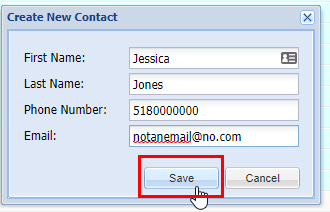
Create New Contact
You also have an option to create a new contact which will be added to the web portal. Press the Create New Contact button and fill out the information in the pop up accordingly. After you are finished press the Save button. The Contact will automatically be added as an Included Contact after saving.

Edit Conference
Overview
This screen is dedicating to editing conference bridges as well as managing the users that can join said conferences. If you are looking to create a New Conference, check out the New Conference page.
Editing a Conference

| Field |
Type |
Description |
| Conference Room | Numerical Field | Conference room a number (this will be used later to access the conference). |
| Conference Name | Field | Descriptive name of the conference room. |
| Max Participants | Drop Down | Number of max participants that can join the conference. |
| Conference Type | Drop Down | Type of conference; private, restricted or open. |
| Start Date | Calendar | Date that the conference will be active. |
| Start Time | Drop Down Time | Time the conference will be active (15 minute intervals, 12 hour clock). |
| Buffer Time | Drop Down Time | Time that the conference will be available before the start time (5 or 10 minutes). |
| Duration | Drop Down Time | Time the conference will remain active (15 minute intervals). |
| Recurring | Drop Down | How often the conference will occur at the exact time. |
| Recurring End | Calendar | Date the recurring conference will end. |
| Lecture Mode | Checkbox | Only the leader is able to speak, other participants are muted. |
| Leader Required | Checkbox | If checked the leader must join for the conference start, otherwise starts when first participant joins. |
| Automute Mode | Checkbox | Participants are muted upon joining. |
| Auto Recording | Checkbox | Recording starts upon the second person joining. |
| Save | Button | Saves the conference assuming all requirements have been met. |
Participant Management
Available Participants
This panel includes Participants that can potentially be added to the Conference in question, note that this panel is only useful if the conference in question has any of the following options selected;
- Lecture Mode - Only the leader of the conference can speak.
- Leader Required - The leader must join to start the conference.
- Restricted Conference Type - Only included participants with a valid pin can join.
- Private - User with any valid pin can join.
All of the previous options are configuring here and in the Included Participants panel on the right (more information on this below). To add and manage Participants follow the options in the accordance to the table below. After you have added the desired Participants move on to the next section Included Participants.
Note
Names that are highlighted in blue are Contacts while those that are not highlighted are System Users, this is also shown as a Yes or No under the Contact column.


| Item |
Function |
Type |
Description |
| 1 | User Editor | Button | Jumps to the System Users screen. |
| 2 | Contact Editor | Button | Jumps to the Personal Contacts screen. |
| 3 | Quick Find | Search Field | Search Available Participants. |
| 4 | Available participants | Value | Shows available contacts from personal contacts, corporate directory, and the System Users screen. |
| 5 | Include | Button | Includes Available Contact. |
Included Participants
This panel includes Participants that have been included in the conference in question. As stated previously this is only effective if the conference has certain options set beforehand. In addition to the options included in the column there are also a few buttons that have specific functions as well, as explained below.
| Exclude | Button | Removes a Participant from Included to Available. |
| Name | Value | Name of the contact/user. |
| Contact | Value | Defines whether Participant is a contact or a user. |
| Leader | Checkbox | Defines whether or not Participant is a leader, Required for Leader Mode and Lecture Mode. |
| Moderator | Checbkox | Defines whether or not Participant has options for managing the conference call. |
| Notify | Checkbox | Defines whether or not Participants is to be notified when using Notification button. |
| Pin | Button/Pin | When press gives the participant a random Pin number for accessing the conference, after pressing the pin will be shown for future reference. |
Notifying Participants
You are able to notify participants via email with meeting details as well their meeting pin. To setup a template for emailing participants check out the Configuration screen (coming soon). To notify all the of participants included in a conference click the Notify All Participants Button, alternatively if you wish to select a specific set up of participants, check the Notify box located in the Notify column. When you press either buttons a pop up message will appear stating how many participants have been notified.


Create New Contact
You also have an option to create a new contact which will be added to the web portal. Press the Create New Contact button and fill out the information in the pop up accordingly. After you are finished press the Save button. The Contact will automatically be added as an Included Contact after saving.


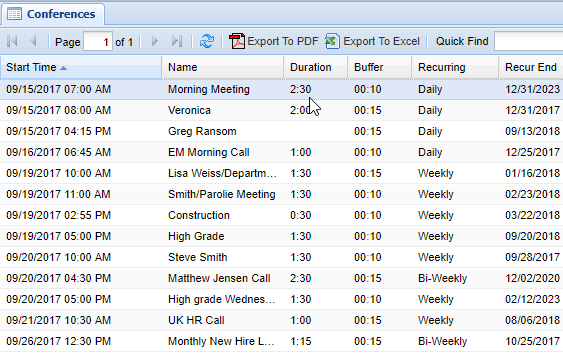
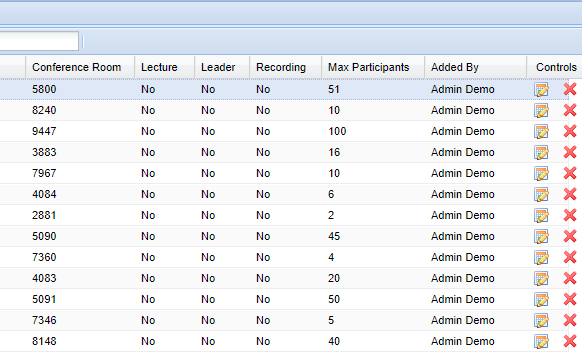
Conferences
Overview
This screen is dedicated to viewing all of the conferences that have been created, as well as giving the option to delete any conferences that won't be utilized anymore.
Conferences
| Field |
Description |
| Start Time | Time the conference will become active |
| Name | Descriptive name of the conference room. |
| Duration | Time the conference will remain active (15 minute intervals). |
| Buffer | Time that the conference will be available before the start time (5 or 10 minutes). |
| Recurring | How often the conference will occur at the exact time. |
| Recur End | Date the recurring conference will end. |
| Conference Room | Conference room a number (this will be used later to access the conference). |
| Lecture | Only the leader is able to speak, other participants are muted. |
| Leader | Yes / No Leaders Mode |
| Recording | Yes / No Recording |
| Max Participants | Number of max participants that can join the conference. |
| Added By | User the conference was created by. |
| Controls | First Button takes you to edit Conference, Second Button Red X prompts to delete Conference |

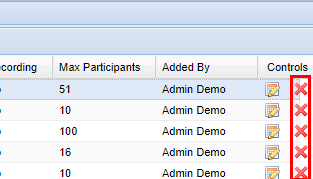
Deleting a Conference
To delete a conference click the red X for the corresponding conference you wish to delete which is located under the Controls column. A confirmation pop up will appear confirming that this is the selection you wish to delete.

Conference Logs
Overview
This screen is dedicated to showing data gathered about previous Conferences. You are able to view such info such as when a conference began and ended, which participants joined, among other key pieces of data.
Conference Logs
The table below represents the data presented in the Conference Logs screen on the right. You also have the option to press the + button located on the far left side of each log entry to expand the log and view all the members who joined the conference.


Overview
This section of the IntellaSoft documentation is specific to the IntellaConference conference bridge system. This is another optional product of IntellaSoft that allow advanced customization and configuring of conference bridges to allow multiple parties to connect to. This product helps bypass some of the limitations of the polycom that typically allow a limited number of lines connected in conference mode vs how many parties may need to actually connect. For example the IntellaConference currently allows up to 50 connections while being able to grant multiple parties leader and moderation privileges. There are two elements of the conference bridge, the web portal which allows for basic configuration of bridges, and the calls themselves, both which are covered in this documentation.
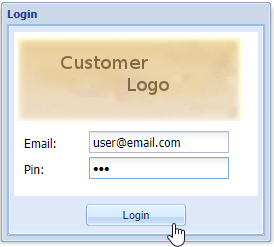
Logging In
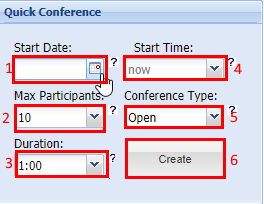
Quick Conference
You may have noticed that you have the option to make a conference with a few basic settings from the Welcome screen. Follow the steps below to setup the basic settings of the conference, bear in mind once you press the Create button you will be taken to the Edit Conference screen where you will able to further modify the advanced settings of a conference.
| 1 | Start Date | Select a start date for the conference to be open from a calendar menu. |
| 2 | Max Participants | Sets the maximum number of parties that can connect to a conference (currently 50 is the maximum). |
| 3 | Duration | Duration the conference will be reserved for (open to join, and active). |
| 4 | Start Time | Sets the time that the confernece will be open (15 minute increments, 12 hour AM/PM format). |
| 5 | Conference Type | Sets the conference to Open (anyone can join), Private (only users have a pin can join), Restricted (users must have a pin and be added to conference contacts from the web portal). |
| 6 | Create | Finalizes the initial set of settings and will take you to Edit Conference screen for further options. |
Tip
Hover over the ? to get a contextual tip on what each function is used for, this also applicable for other screens as well.